 how-to
Why Your Dryer Takes Two Cycles to Dry: Diagnosis & Fixes
Table of Contents
- Why Your Dryer Is Taking Two Cycles to Dry
- Clogged Dryer Vent Symptoms and How to Inspect
- Dryer Lint Filter Cleaning and Maintenance
- Dryer Moisture Sensor Not Working: Diagnosis and Cleaning
- Dryer Taking Multiple Cycles to Dry: Load and Heat Factors
- Quick Diagnostic Flowchart: Airflow, Heat, or Load?
- When to Call an Appliance Technician
- Prevention and Maintenance Schedule
- Frequently Asked Questions
Last Updated: October 10, 2026
Why Your Dryer Is Taking Two Cycles to Dry
Your dryer taking two cycles to dry wastes time and energy, but most causes are fixable without a technician.
Clogged Dryer Vent Symptoms and How to Inspect
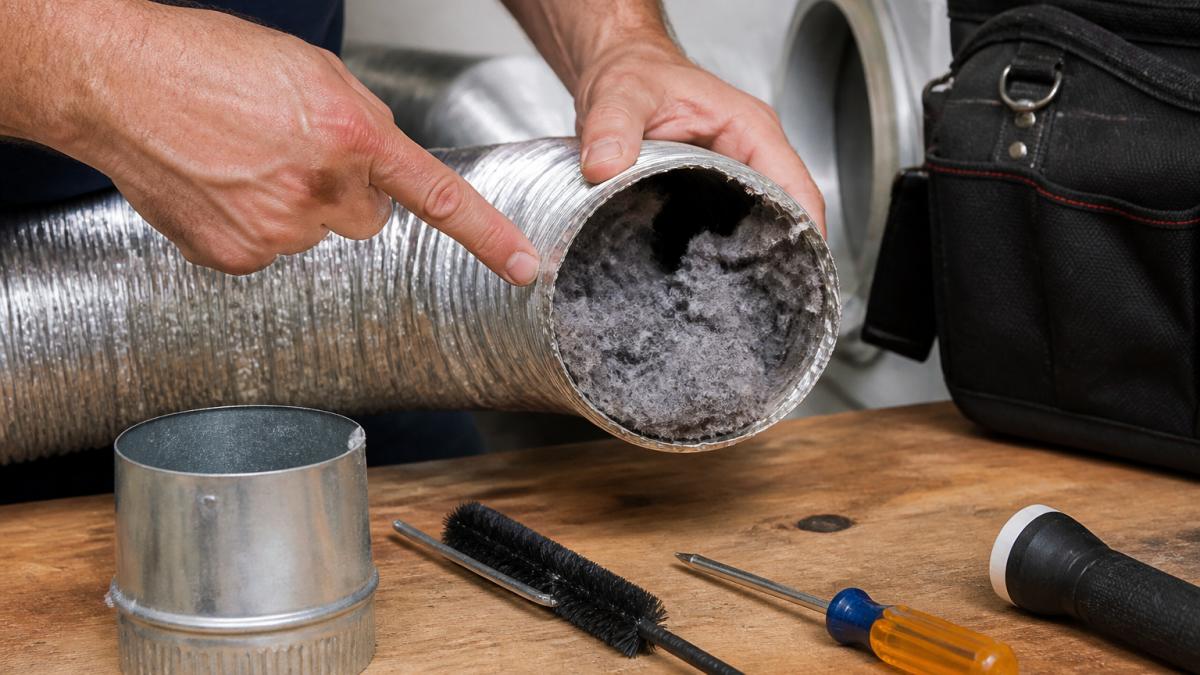
A clogged dryer vent is the #1 reason dryers take multiple cycles to dry clothes. When lint blocks the exhaust duct, hot air can't escape and the dryer runs longer trying to reach its target dryness level.
Signs your vent is clogged include:
- Clothes feel damp or cold at the end of a cycle
- Lint appears around the dryer door seal
- The dryer gets very hot to the touch on the outside
- A burning smell comes from the dryer
- Lint buildup is visible at the exterior vent opening
Step 1: Check Exterior Vent Opening
Walk to where your dryer vent exits your home. Hold your hand near the vent while the dryer runs, you should feel strong, warm air. If airflow is weak, your vent is likely restricted.
Inspect the vent cover for lint packed around the edges or blocking the flapper. Pull away visible lint by hand. If the cover is damaged or the flapper doesn't move freely, replace it.
Step 2: Inspect the Vent Hose
Disconnect the dryer and check the vent hose at the back. Use a flashlight to look inside the hose opening for lint buildup. Feel the inside carefully, if you feel a thick layer of lint, that's your problem.
Use a vent brush or plumbing snake to push lint out, or disconnect the hose and shake it over a trash can. A vacuum with a hose attachment also works well.
Dryer Lint Filter Cleaning and Maintenance
Your lint filter catches most debris, but lint can slip past and accumulate in the trap housing. Many people clean the screen but forget the housing, that's where lint sneaks through.
Daily Lint Screen Cleaning
Remove the lint screen after every load. Peel lint off with your fingers or a brush. If it sticks, wash the screen under warm water. This single task prevents most dryer problems.
Never run your dryer without the lint filter in place. It protects the internal components and keeps lint out of the vent.
Deep Cleaning the Lint Trap Housing
Pull out the lint filter and use a flashlight to look into the slot. Use a thin brush or old toothbrush to brush out trapped lint, then vacuum with a hose attachment. Deep clean the lint trap housing every 6 months.
Dryer Moisture Sensor Not Working: Diagnosis and Cleaning
Modern dryers use moisture sensors to detect when clothes reach target dryness. When the sensor fails or becomes dirty, the dryer runs indefinitely or stops too early. Cleaning the sensor bars often solves the problem without parts replacement.
Understanding How Moisture Sensors Work
Most dryers use one of two sensor types:
Moisture-bar sensors consist of two small metal bars mounted inside the dryer drum or on the interior wall. When moisture is present, electrical resistance changes and the dryer keeps running. Once clothes dry, the dryer stops. If lint or detergent residue coats the bars, the sensor cannot detect moisture accurately and the dryer runs too long or stops prematurely.
Diagnosing a Sensor Problem
Before you clean or replace the sensor, confirm it's actually the issue:
Test 1: Run an automatic cycle with damp clothes. If the dryer shuts off while clothes feel damp or runs 45+ minutes on a light load, the sensor is dirty or failing. Test 2: Run the same load on a timed cycle. If the automatic cycle takes significantly longer or stops early, the sensor is the culprit. Test 3: Inspect for visible buildup. Unplug the dryer and look at the sensor bars. If you see a white, gray, or yellowish coating, the sensor needs cleaning.
Locating Your Moisture Sensor
Sensor location varies by model. Consult your dryer's manual or search the model number online to find the exact location.
Cleaning the Sensor Bars
Step 1: Unplug the dryer. Step 2: Locate the sensor bars with a flashlight. Step 3: Wipe gently with a soft, lint-free cloth or magic eraser sponge. Dampen slightly if needed, but do not soak. Rub each bar for 10-15 seconds with light pressure. Step 4: Dry thoroughly with a dry cloth and allow to air-dry. Step 5: Test by running an automatic cycle with damp clothes.
When Cleaning Doesn't Work
If cleaning doesn't restore normal drying time, the sensor may be faulty and require replacement ($150-$300). Do not ignore a faulty sensor, it wastes energy and increases wear on the heating element and motor.
Preventing Sensor Buildup
Clean the lint filter after every load and deep-clean the lint trap housing every 6 months. This prevents lint from accumulating inside the dryer and coating the sensor bars. Avoid using fabric softener sheets, which leave residue that coats sensors faster. If you use fabric softener, use the liquid type in the washer instead, or skip it altogether. Consistent maintenance routines remain the most effective way to prevent lint buildup throughout the entire ventilation system.
Dryer Taking Multiple Cycles to Dry: Load and Heat Factors
Sometimes the issue is how you're using the dryer or a heating-system problem. Overloading, wet laundry, and heating-element failures are common reasons dryers need extra cycles.
Overloading and Load Size
A packed dryer drum cannot circulate air properly. Fill your dryer only three-quarters full to allow clothes to tumble freely. You should be able to place your hand in the drum and close your fingers without touching clothes. Smaller loads dry faster and use less energy.
Wet Laundry and Washer Spin-Cycle Problems
If your dryer consistently needs two cycles, the problem may originate in your washing machine. Check your washer's spin cycle. The washer should spin at high speed for 1-2 minutes to extract water.
Common causes include unbalanced loads, overloading, faulty lid switches, and worn drum bearings.
Wring out heavy items by hand before loading the dryer. This cuts drying time and reduces stress on the heating element.
Heating Element and Heat-Source Problems
If your dryer produces little to no heat, the heating system is failing. Electric and gas dryers require different troubleshooting.
Electric Dryers: Heating Element and Electrical Supply
Electric dryers use a heating element to warm the air. Test for heat output: Turn on the dryer and place your hand near the lint-trap opening.
Check the circuit breaker. If a breaker has tripped, the dryer will run but produce no heat.
Heating element failure: If the breaker is on and the dryer produces no heat, the heating element has burned out. Replacement typically costs $200-$400 in parts and labor.
Gas Dryers: Igniter, Burner, and Thermostat
Gas dryers use a gas burner to heat air. An igniter sparks the burner, and a thermostat controls temperature.
Test for heat output: Turn on the dryer and listen for a clicking sound near the burner.
Check the gas supply. Ensure the dryer's gas valve is open. Look for a lever on the gas line at the back of the dryer, it should be parallel to the gas line.
When to Stop Using the Dryer
Do not continue using a dryer with heating problems. A failing heating element or igniter can overheat and create a fire hazard. Stop using the dryer immediately if:
- You smell burning plastic, rubber, or electrical odors
- You see smoke or visible flames inside the dryer
- The exterior of the dryer is too hot to touch
- The dryer shuts off unexpectedly or makes unusual grinding or popping sounds
Unplug the dryer and call an appliance technician or your local fire department if you suspect a fire hazard.
Deciding Between Repair and Replacement
If your dryer is more than 10 years old and requires a heating-element or igniter replacement, consider whether repair or replacement makes financial sense.
- Heating element replacement: $200-$400
- Gas igniter replacement: $250-$500
- New dryer: $400-$1,200 for a basic model; $1,200-$2,500 for a high-efficiency model
If repair costs exceed 50 percent of a new dryer's price, replacement is often the better choice.
Quick Diagnostic Flowchart: Airflow, Heat, or Load?
Use this simple flowchart to pinpoint your dryer problem:
Does the dryer produce hot air?
- Yes → Move to next question
- No → Heating element or electrical issue (call technician)
Does the air escape freely at the exterior vent?
- Yes → Move to next question
- No → Clogged vent (clean the vent hose and exterior opening)
Does the lint filter look clean?
- Yes → Move to next question
- No → Clean the lint filter and trap housing
Do you usually fill the dryer more than three-quarters full?
- Yes → Reduce load size (problem likely solved)
- No → Move to next question
Does the dryer stop on automatic cycles or run indefinitely?
- Stops when clothes are damp → Clean the moisture sensor
- Runs too long → Sensor may be faulty (consider replacement)
When to Call an Appliance Technician
Call a technician if the dryer produces no heat, the drum doesn't spin, you see visible damage, it smells like burning, cleaning the vent and sensor doesn't help, or the circuit breaker trips repeatedly. If your dryer is more than 10 years old and requires major repairs, replacement may cost less. Fast Appliances LLC offers new dryers.
Prevention and Maintenance Schedule
Keep your dryer running efficiently with a simple maintenance routine:
After every load:
- Remove and clean the lint filter
Every month:
- Wipe down the exterior vent opening
- Check for lint around the dryer door seal
Every 6 months:
- Deep clean the lint trap housing
- Inspect the vent hose for restrictions
- Clean the moisture sensor bars
Every year:
- Disconnect the vent hose and shake out accumulated lint
- Inspect the exterior vent cover for damage
- Check that the flapper moves freely
Regular maintenance prevents most dryer problems before they start. A well-maintained dryer dries clothes in one cycle, saves energy, and lasts longer.
Frequently Asked Questions
Why is my dryer taking two cycles to dry my clothes?
Your dryer likely has restricted airflow, a dirty lint filter, or a faulty moisture sensor. The most common cause is a clogged dryer vent that prevents hot air from escaping efficiently. Check your vent hose for lint blockages, clean your lint screen thoroughly, and inspect the moisture sensor bars for lint residue. If airflow appears normal, your heating element may be failing or your dryer may be overloaded.
What are the main clogged dryer vent symptoms?
Signs include clothes staying damp after a full cycle, the dryer feeling hot to the touch on the outside, a burning smell, or lint visible around the exterior vent opening. You might also notice the dryer taking significantly longer than usual or shutting off mid-cycle. Check your exhaust duct for blockages and ensure the exterior vent flapper opens freely when the dryer runs.
How often should I clean my dryer lint filter?
Clean the lint screen after every load to maintain optimal airflow. Additionally, perform a deep clean of the lint trap housing monthly by vacuuming inside the cavity where the filter sits. Over time, lint can escape the screen and accumulate in areas you can't see, reducing drying performance even when the visible lint screen appears clean.
How do I know if my dryer moisture sensor is not working?
If your dryer's automatic cycle runs for the full time even when clothes are dry, or if the moisture sensor setting no longer shortens drying time, the sensor may be dirty or faulty. Inspect the sensor bars (usually located inside the drum or on the interior wall) for lint coating. Gently clean them with a soft cloth and rubbing alcohol. If cleaning doesn't help, the sensor may need replacement by an appliance technician.
If your dryer is still taking two cycles after trying these fixes, it's time to upgrade. Fast Appliances LLC carries reliable dryers designed for everyday families. We offer convenient online ordering, competitive pricing, and straightforward delivery to your home. Browse our selection today and find a dryer that works as hard as you do.